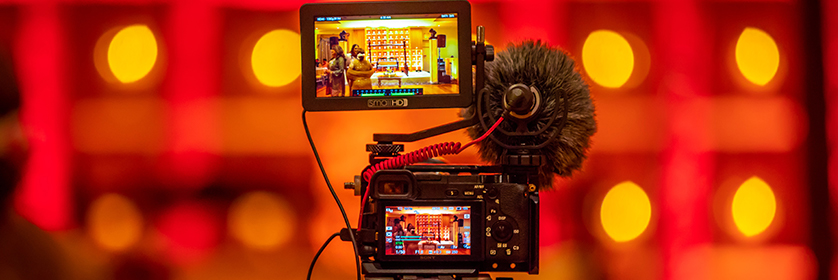
Start this week by watching this edited clip of an educational video:
Making Films That Teach (Encyclopaedia Britannica Films, 1954/2002).
If you would like to see the full-length video, visit Making Films That Teach (Encyclopaedia Britannica Films, 1954/2002).
Overview
On This Page
Video production for education was once reserved for large institutions with large budgets. Over the last few decades video recording has become more and more accessible. Today, excellent video can be created with a smartphone, broadcast live, and the recordings shared with millions of people. The technical ability to create video has advanced and is within the reach of all educators and students. However, opportunities for educators to invest time and effort in videos that will be durable and shareable can be difficult to take advantage of without first having some skills or experience. In these two weeks, you will have opportunities to create and edit videos that will support learning.
Similarly, students are already making videos. Developing student abilities to communicate with video is a key literacy that should advantage your students in the future. Moving from in-the-moment video to creating a video project is the path students should be able to follow in their efforts to demonstrate their own learning over the K–12 and post-secondary years.
Learning Outcomes
When you have completed these weeks, you should be able to:
- Design and configure video for learning.
- Develop and edit video for learning.
- Implement accessibility strategies for video.
- Discuss video production projects for student.
Topic 1: Find and Situate Video for Learning
This topic will explore sources you can use to find existing videos suitable for your students, and how to best situate these videos within your lessons.
Video Repositories
A key difference in sourcing and integrating videos comes from their nature as whole pieces of media that stand on their own. While we tend to look for images that we can copy and modify, linking to or embedding an existing copyrighted video that is hosted in a repository is often suitable for our needs.
Video repositories like YouTube or Vimeo are web-based services that provide access (either on their own site, or embedded on yours), to videos produced by users. The videos on these sites are created by amateurs or professionals.
Neither linking to a video on the internet nor embedding a video on our own site are violations of copyright, as no copy is made. That said, many repositories host videos that are obvious copyright violations. Linking to or embedding these videos is an ethical issue, particularly because students learn from your own practices with media.
There are two strategies to use when searching for videos to support learning. The first is to search the large repositories like YouTube to find something suitable. The second is to look for videos that may offer a better fit for the learning outcome in specialized collections like the National Film Board of Canada. Smaller collections are less likely to offer an embed system that allows you to feature their video on your own site, but they often contain superior videos that could be shared with students by a link. Linking to a superior video in a smaller collection supports learning better than embedding a less suitable video on your site.
Using a video repository is usually the simplest way to store and distribute your own videos as well. If you work within a large institution, you may have access to an institutional video repository like Kaltura that will offer many of the features found on YouTube.
You may also have access to a media server or web server space to put your own videos on the internet. This will require you to generate your own embed code to display these videos in a player. This option is rarely available in educational institutions these days, so it won’t be explored further here.
Linking and Embedding
There are obvious advantages to embedding a video over linking to it on another site. Maintaining cohesion in an online lesson is important, and every link away from your site is an opportunity for distraction. If you design a lesson with pre-viewing questions and a post-viewing activity, it will be more successful if these components can be physically situated just before and after an embedded video on your web page.
In other situations, effective videos may not be available to embed so linking is the only option. The best practice is to explain the purpose of the video within the lesson, and then link to it in a new window so that the student’s original place in the online lesson is not lost.
There are several considerations in embedding a video within your online lesson. The media player size can often be controlled. Typically, the largest viewer is appropriate to show detail, but “talking head” videos need not be played at full screen. You should always include an option to view at full-screen (most players include this), and offer a link to the video on the original platform. Just like the VHS tapes of old, an experienced instructor plays the video from the start time relevant to the learners. Customizing start times is possible in most repository players. In the description for Activity 2, you will find key configuration steps for videos on YouTube and Vimeo.
Accessibility for Video
Accessibility for video includes any steps in video design and in technical production and presentation that supports the use of video by a wide variety of end users.
In selecting existing videos or developing your own, you need to consider the accessibility needs for your media. A typical rule to follow is that videos that will persist over the years should be considered for accessibility steps while videos that are contextual (intro videos etc.) might not.
The major accessibility steps for video include captions which work like a transcript delivered in real time on the screen, and audio description which provides an additional audio track to describe the action on screen. Many instructors will also seek to offer a text-based resource equivalent to a video. While audio description is technically challenging, captioning is reasonably easy for instructors to accomplish. YouTube provides automated caption generation (with the ability to correct captions later).
Other configuration choices can support accessibility. When you embed a video player, you should ensure that learners will be able to play a video repeatedly, pause, and rewind. They should be able to note time-stamps for portions that may want to return to.
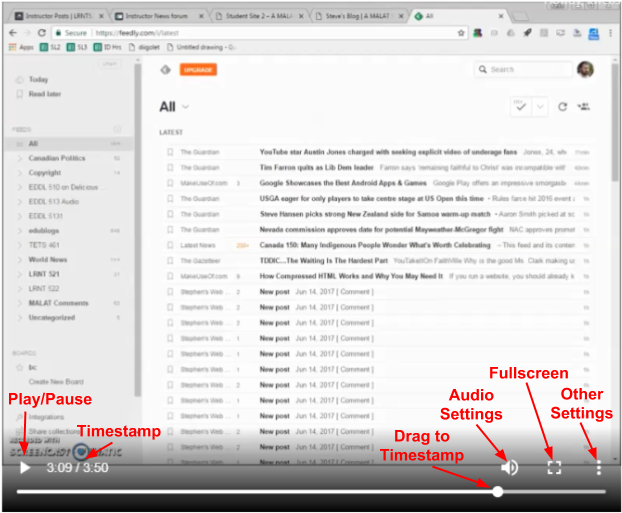
Figure 1: HTML5 native video player is included in most modern web browsers
Enabling the close study of a video supports learners of all abilities.
Activity 1: Readings
Please read the following report starting with ‘Affordances of Video’ (pp. 12-13) and then focusing on the components of the report that speak to your teaching context:
Woolfit, Z. (2015). The effective use of video in higher education (Rep.), 10-38. Retrieved October 2, 2018, from https://www.inholland.nl/media/10230/the-effective-use-of-video-in-higher-education-woolfitt-october-2015.pdf
Then read these two pieces describing research supported principles for increasing the effectiveness of instructor created video.
Fiorella, L. (2022). Multimedia Learning with Instructional Video. In R.E. Mayer & L. Fiorella (Eds.), The Cambridge Handbook of Multimedia Learning (pp. 487-497). Cambridge University Press.
Mayer, R. E., Fiorella, L., & Stull, A. (2020). Five ways to increase the effectiveness of instructional video. Educational Technology Research & Development, 68(3), 837–852.
Write a short portfolio post considering the affordances of video and video production styles that are summarized (pp12-13), and the implications of the research in the second article, for video you could develop for your own teaching. Consider one learning outcome you need to support, describe an affordance provided by video that would support that outcome, and a suitable production style. If you don’t currently have a teaching role, write the post in relation to a past context, or for learning that you support in another capacity, or for a teaching role you hope to have in the future.
There are a few areas where Woolfit does not completely connect effective video to successful learning. Woolfit (p. 10) argues that from a pedagogical perspective video is effective when it is aligned with learning goals and content, but I would argue that video must also utilize research-backed principles (like Mayer’s principles) to have the greatest likelihood of supporting learning. Woolfit’s report explains many genres of educational video but talks quite a bit about lecture-capture (the recording of entire classroom lectures) a method that is among the more difficult to make truly effective.
Activity 2: Find and Integrate Video Resources
In Week 2 you explored different sources for media that you can use for teaching and learning. In this activity you will find a video that will support a lesson and integrate it within an online activity.
As you have done for previous activities, create a learning outcome for a lesson and then look for a video that will support your learning outcome.
Create a portfolio post that integrates your video into an activity or lesson (this should be short, not a multipage unit or lesson). Embed your video on this portfolio page, situated with text that clearly explains what students are to do.
To embed a video on your WordPress blog you will need to use one of two processes.
If you intend to use the whole video with the default settings from YouTube or Vimeo, you can embed the video on your post by placing the URL on its own line within the post body. This triggers the Embed protocol which requests an up-to-date video player from the service.
If you need to have more control over your embedded video, like player size or start time, you can use the iFrame embed code offered on either site. To do this you will need to build or edit your post using the ‘Text’ tab, rather than the ‘Visual’ tab that has all the formatting buttons. Here’s where to find embed code on YouTube and Vimeo.
YouTube
- From the video page, select the ‘SHARE’ link just below the video.
- On the pop-up window under ‘Share a Link’, select ‘Embed’.
- On the new pop-up window, select the embed options and start time needed and then select ‘Copy’.
- Paste the embed code in the editing window for your post (make sure you use the ‘Text’ tab).
- If you want to embed a smaller or larger size of the video, find the ‘width’ and ‘height’ parts of the embed code and change them as needed. Note that you should keep the values proportional to avoid stretching or squishing your video player, and check that you aren’t exceeding the maximum size of the video (on YouTube, select the gear, then ‘Quality’ to see the sizes).
- Don’t forget to ‘Publish’ or ‘Update’.
Vimeo
https://www.vimeo.com
https://help.vimeo.com/hc/en-us/articles/360000121668-Starting-playback-at-a-specific-timecode
- From the video page, select the ‘Share’ link.
- On the pop-up window, select ‘Show options’ adjacent to the ‘Embed’ section.
- Choose your settings (note you can select player size here).
- Copy the embed code.
- Paste the embed code in the editing window for your post (make sure you use the ‘Text’ tab).
- If you want to set a start time for your video, find the ‘src=’ (ie. src=”https://player.vimeo.com/video/207763253″) and add “#t=1m15s” at the end, where 1m15s is one minute and fifteen seconds – add your own timestamp.
- Don’t forget to ‘Publish’ or ‘Update’.
Situating Video in an Activity
- Post must include title, instructions by step, timeline, and deliverable if necessary.
- Embed the video at an appropriate size but include a link to view at full size (often included in embedded player).
- Add a link to the video as found on the hosting service (often included but add your own in case the service stops providing it).
- Embed the video so that it will start playing at the appropriate part of the video.
- Situate the video on the page in a way that integrates well with the rest of the content.
In a comment to your post, relate your choices around video selection and placement to course readings and theory.
Once you have completed your post, visit the videos embedded by other students and offer your thoughts on the effectiveness of the post.
Your Open Learning Faculty Member will offer feedback on this activity.
Topic 2: Recording and Editing Video
Producing your own video ranges in scale from an informal introductory video to an educational piece planned and produced by yourself and several colleagues. In each case there are steps you can take to ensure your video is as effective as possible, without adding to your workload.
Read ‘Creating Video for Education’ for an overview of the steps in the video production method and an introduction to several genres of video.
Activity 3: Record a Video
Note: the media your produce for Activities 3-6 could become an element within your ‘Assignment 3: ePortfolio of situated educational media’. These activities could serve as a dry run for another piece of media, or you could incorporate feedback and your own reflection to submit an improved version.
In this activity you will record a short live-action video. You may want to embark directly on creating a video that supports learning, or you may just record a video that helps you explore the hardware and software you have at hand.
Start by planning, at a minimum, a short video (at least 30 seconds, no more than 2 minutes), that will include movement and spoken voice. You will use this video later to practice editing in another activity.
You can use any video recorder you have at hand. A smartphone often provides a very good quality of recording, as will many digital cameras. You can use a webcam if that is what you have, but they tend to limit what can be done – leading to lots of talking head videos.
Once you have recorded your video embed it in a portfolio post named ‘Creating and Editing Video’ by one of the methods described above. If it is 10 Mb or under you can put it in the media library of your blog, otherwise use a service like YouTube. If the video you have recorded is in a format that WordPress won’t embed from the media library, or that YouTube or Vimeo refuse to accept, use an online conversion tool like media.io to convert it to MP4 format. Consider the readings and theories explored in the course and note any ways that your video incorporated them.
On your portfolio post (in addition to your embedded video), describe the process you used to create this video, the tools and software you used to create it, and how you embedded it on the page. Once you’ve posted, visit other student blogs, review their processes in creating a video and comment if appropriate.
Activity 4: Record a Screencast
In this activity you will record a short screencast of your computer and embed it on a portfolio post. Consider a computer program, website or presentation that you could run through as a video aid for students. Once you have an idea for your video, reverse engineer a learning outcome to make your purpose clear to others. Consider the readings and theories explored in the course and note any ways that your video incorporated them.
Use Screencast-O-Matic (or another program if you have one) to record your screencast. Embed it in the ‘Creating and Editing Video’ portfolio post and describe the process you used to create it.
Activity 5: Edit a Video
This activity will give you the opportunity to practice editing a video. This is an important skill to progress beyond single-shot videos so that you can cut scenes, add titles and combine video from different sources.
Take the videos you have created so far (or record a few more) and edit them to create one complete and reasonably coherent video. Your completed video should include the following.
- Titles at the beginning of the video
- Fading transitions between scenes
- Video footage from at least two original sources (you can also add still images and external audio if you wish)
Once you have created your video embed it in the ‘Creating and Editing Video’ portfolio post and describe your process and experience editing it to final version. Consider the time you dedicated to this activity and reflect on your expectations for proficiency (did it seem like you were getting better? Will you be able to do this faster?) and where you would use these skills in creating a video and where you would stick to simpler processes.
There are resources for the Shotcut video editor and for iMovie in the Readings and Resources section. The tutorial below is a good introduction to Shotcut and the tasks you will want to complete with it.
Once you have completed Activities 3-5, explore the posts from other students to see how they accomplished these technical tasks. Offer advice where you think you can and ask questions about results you would like to match.
The instructor will offer feedback on these activities in the completed post.
Keet, J. (2018). Shotcut Video Editor 2018 Tutorial – Designed for Beginners. Teacher’s Tech.
https://www.youtube.com/watch?v=hlDG90sbhQY
Activity 6: Add Captions to a Video
It is important to learn the skills that will allow you to make your media accessible to more learners. In this activity you will explore the process of generating captions for your own video using YouTube.
Take a video that you have produced, and that has voice in the audio, and upload it to YouTube. Wait up to a day to see the captions YouTube generated and then go in and edit the captions to make them more accurate and more usable for learners (a strictly accurate set of captions isn’t necessarily the most benefit to all learners – feel free to edit out YouTube’s attempts to transcribe your ‘ums’).
Share your captioned video in a new portfolio post and go look at the captioned videos from other students. Comment on the suitability of the captions produced in YouTube. Do they appear in a timely manner? Are they displayed long enough or too long?
Topic 3: Student Video Projects
Student-created videos are great opportunities for complex activities that can meet many learning outcomes from any number of disciplines. They can combine outcomes around the analysis and synthesis of content as well as communications skills and digital literacy.
Videos as a platform for student learning and interaction can be simple introductory clips or significant projects with higher production values. At a larger scale videos are great opportunities for team-based projects. A well planned and produced video has multiple roles at different stages, allowing team members multiple opportunities to work as part of a group.
In Unit 6 you explored key aspects of student media projects. That material is key to the effective design of a substantial student video project.
Activity 7: Outline Student Video Activities
In this activity you will outline a short student video activity and a substantial video project, providing a few key details to sketch out an initial premise for each.
In a portfolio post, outline two student activities.
The first is a short individual video activity. Students will create and share a video of 2 minutes or less in an activity that takes less than an hour to complete.
In the second teams of students will create a video of 5 to 15 minutes duration as the culminating deliverable of a major unit of learning (2 weeks or more).
For each outline present the following details.
- Course, topic and grade/age level
- 1 learning outcome addressed by producing the video
- Software and hardware you anticipate students will use
- Platform where students will share or distribute their videos
Review the posts from fellow students and offer suggestions and ask questions as appropriate.
References and Resources
Required Readings and Resources
Allan, P. (2015). How to Improve Your Photos and Videos with Affordable Lighting. Lifehacker.
https://lifehacker.com/how-to-improve-your-photos-and-videos-with-affordable-l-1715963400
Encyclopaedia Britannica Films. (2002, July 16). Making films that teach [Video]. Internet Archive.
https://archive.org/details/MakingFi1954 (Original work published 1954.)
Fiorella, L. (2022). Multimedia Learning with Instructional Video. In R.E. Mayer & L. Fiorella (Eds.), The Cambridge Handbook of Multimedia Learning (pp. 487-497). Cambridge University Press.
https://www-cambridge-org.ezproxy.tru.ca/core/books/cambridge-handbook-of-multimedia-learning/principles-for-educational-assessment-with-multimedia/88893469E98C177F37665496C5303F4A
Guo, P., Kim, J. & Rubin, R. (2014). How Video Production Affects Student Engagement: An Empirical Study of MOOC Videos. ACM Conference on Learning at Scale, 2014.
http://up.csail.mit.edu/other-pubs/las2014-pguo-engagement.pdf
Keet, J. (2018). Shotcut Video Editor 2018 Tutorial – Designed for Beginners. Teacher’s Tech.
https://www.youtube.com/watch?v=hlDG90sbhQY
Kumu Wiki. Creating Video for Education.
https://kumu.tru.ca/Creating_Video_for_Education
Kumu Wiki. Shareable Media.
https://kumu.tru.ca/Shareable_Media
Mayer, R. E., Fiorella, L., & Stull, A. (2020). Five ways to increase the effectiveness of instructional video. Educational Technology Research & Development, 68(3), 837–852.
https://ezproxy.tru.ca/login?url=https://search.ebscohost.com/login.aspx?direct=true&db=a9h&AN=143677118&site=ehost-live
Ruffini, M. (2012). Screencasting to Engage Learning. Educause Review.
https://er.educause.edu/articles/2012/11/screencasting-to-engage-learning
Shotcut.
https://shotcut.org/
Shotcut. (2018). Tutorial Videos.
https://shotcut.org/tutorials/
University of Washington. (2018). Creating Accessible Videos.
https://www.washington.edu/accessibility/videos/
Vimeo.
https://vimeo.com/
Vimeo Help Center. (2016). Starting playback at a specific timecode.
https://help.vimeo.com/hc/en-us/articles/360000121668-Starting-playback-at-a-specific-timecode
Woolfit, Z. (2015). The effective use of video in higher education (Rep.)
https://web.archive.org/web/20220119113508/https://www.inholland.nl/media/10230/the-effective-use-of-video-in-higher-education-woolfitt-october-2015.pdf
YouTube.
https://www.youtube.com
Optional Readings and Resources
Apple. (2017). iMovie Help.
https://support.apple.com/en-ca/guide/imovie/welcome/mac
Hart, J. (2018). Video and Animation (Explainer) Tools.
http://c4lpt.co.uk/directory-of-learning-performance-tools/video-animation-tools/
Ljubojevic, M., Vaskovic, V., Stankovic, S., & Vaskovic, J. (2014). Using supplementary video in multimedia instruction as a teaching tool to increase efficiency of learning and quality of experience. The International Review of Research in Open and Distributed Learning, 15(3).
http://www.irrodl.org/index.php/irrodl/article/view/1825
Mayer, R.E. (2014). Research Based Principles for Multimedia Learning. Presentation given at Harvard University, 5 May 2014.
https://www.youtube.com/watch?v=AJ3wSf-ccXo
Mayer, R.E. (2014). Multimedia Instruction. In J.M. Spector et al Eds. Handbook of Research on Educational Communications and Technology. New York: Springer Science & Business Media. [find this chapter linked in the course Moodle site]
MediaCollege.com. Audio Tutorials.
http://www.mediacollege.com/audio/
MediaCollege.com. Camera Shots.
http://www.mediacollege.com/video/shots/
MediaCollege.com. Lighting Tutorials.
http://www.mediacollege.com/lighting/
Videomaker. Basic Training: The 9 Classic Camera Moves.
http://www.videomaker.com/article/10775/
Winke, P., Gass, S., & Syodorenko, T. (2010). The effects of captioning videos used for foreign language listening activities. Language Learning & Technology, (14)1, 65–86.
https://www.lltjournal.org/item/10125-44203/
Wistia. (n.d.). Editing Basics for Business Video: A guide to some basic editing theories that you can apply in any software.
https://wistia.com/library/editing-your-business-video
Wistia. Lighting on the Fly: A minimal and flexible philosophy for lighting your video.
https://wistia.com/library/lighting-on-the-fly
Wistia. (n.d.). Recording Audio for Business Videos: Make sure your message is crystal clear by making your video sound as good as it looks.
https://wistia.com/library/recording-audio-for-business-video